How We Build

Ant Stanley
Co-Founder
11 mins
•
Sep 10, 2024
In a previous post I mentioned that for Wandel we were able to reuse a significant amount of code from HeyBuddy. This post explores how we were able to reuse so much code, and gives you a view of how we build our applications.
Project Structure
We split our codebase into two repositories for frontend and backend respectively. The backend code is a TypeScript monorepo, and the frontend is a Swift codebase using SwiftUI and UIKit. We decided against a monorepo for the entire codebase as there is no shared code or dependencies between the frontend and backend beyond a GraphQL schema.

The backend monorepo consists of three primary services, our core API, our admin dashboard and a small service that defines a single CloudFront distribution we use for all services. There are some other services defined in the monorepo, but they’re dependencies of those three core services. The API service has no dependencies on the other services, Admin Web service requires an instance of the API service as a backend. The Distribution service requires both the Admin Web and API service to be deployed.
Architecture
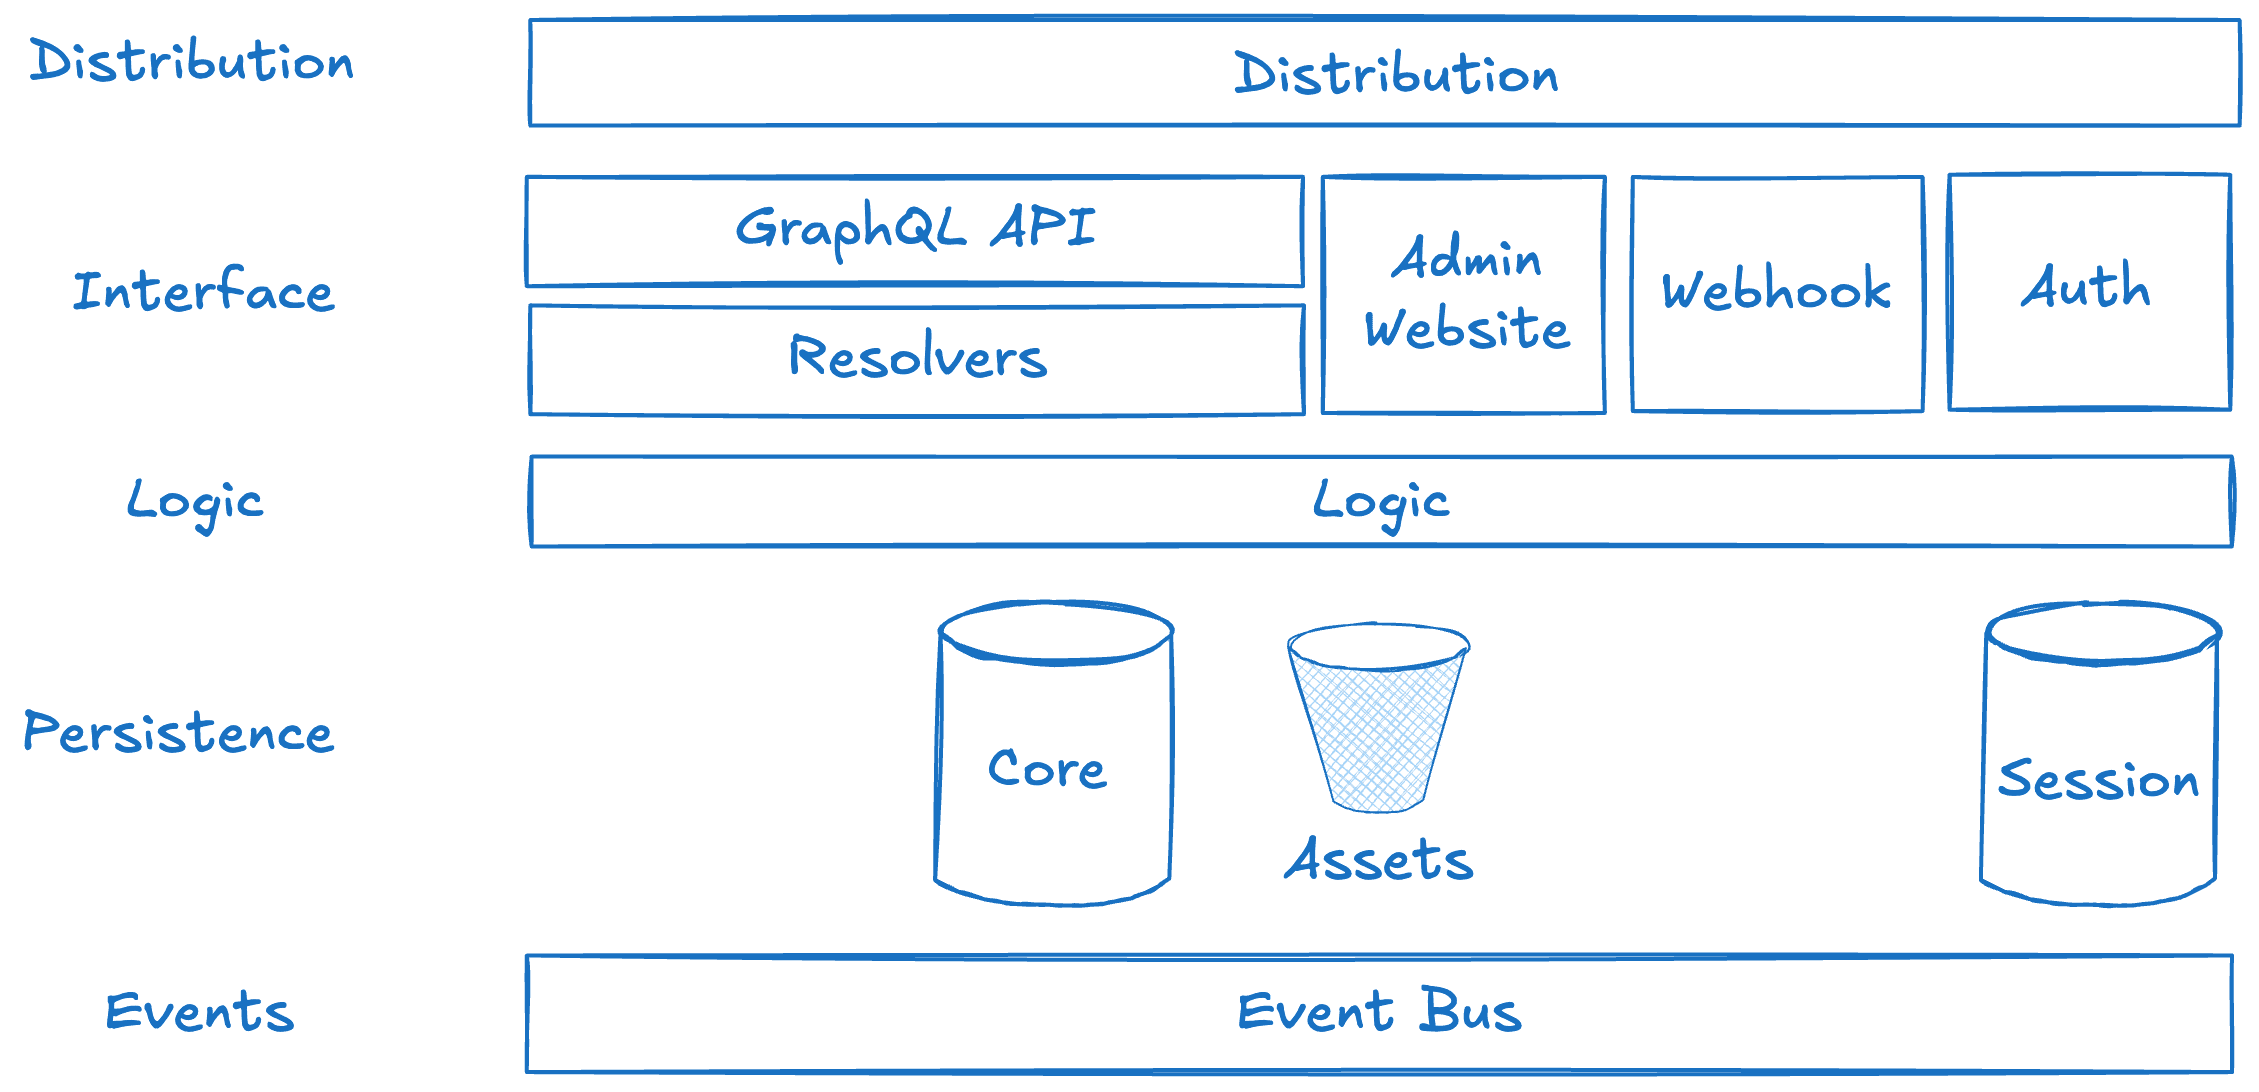
The best way to see how we were able to reuse so much code between two very different applications is to look at the architecture. At a high level the architecture for Wandel and for HeyBuddy is exactly the same, where it diverges is in the implementation of the business logic and on the interface definitions.
Distribution - The best way to resolve CORS issues is to remove them as a class of problem by delivering all assets and interfaces through the same domain. We implement a single CDN distribution in front of all public facing services and interfaces in the app. We do this by mapping different paths on a domain to different origins. This improves overall performance, and security by giving us a single ingress and egress allowing us to put a single Web Application Firewall in front of everything amongst other measures. We deploy this separately as its definition doesn’t often change and deployment times can be lengthy.

Interface - We present three programmatic interfaces into the application, and two graphical interfaces. The three programmatic interfaces consist of the core GraphQL API, a REST endpoint for incoming webhooks and a REST endpoint handling callbacks for our authentication integration.The webhook and authentication callback are very generic, and can be moved to any service with very few changes.
The graphical interfaces are the iOS application, and our administration website. The admin website is a SvelteKit website used to manage users and system defined summary styles.
Logic - The business logic layer is where we implement the logic specific to the application. We utilize hexagonal/onion/ports and adaptors architecture here. Provider interface code is abstracted and separated into shared libraries that is then imported by code that implements the logic. Using this approach for our code that calls LLM providers allows us to quickly add new providers and models with minimal code changes. We currently support 1 transcription provider (Deepgram) and 3 LLM providers (OpenAI, Groq, and Amazon Bedrock), with access to just under 20 models.
Persistence - We persist data in two NoSQL data stores, and object storage. The majority of user data is in the core data store. The second data store is used for session management only, and interfaces with the authentication callback interface. Recordings are stored in the object storage. All data is encrypted.
Event Bus - Every single operation in the system emits an event, which we can subscribe to and take actions on. This is used by the logic layer to trigger some workflows, and for downstream integrations to third party systems.
I specifically haven’t mentioned which services are being used in delivering these components, as this architecture could be implemented using a number of different platforms with different infrastructure components. In our case everything in the diagram is implemented with a single AWS Region, using AWS’s Serverless platform including services like AWS Lambda, AppSync, EventBridge, S3, and DynamoDB. These components could easily be swapped for a container based architecture using a relational database. The logical architecture would remain the same.
The key drivers for using a serverless approach is a granular usage based pricing that scales up (and down) based on real world usage, which gives us per user cost predictability. It also gives us the ability to deploy completely ephemeral environments with no shared infrastructure very quickly. This provides better isolation between environments, and gives us greater confidence when progressing releases through the deployment pipeline as the development environment is exactly the same as the production environment.
Deployment
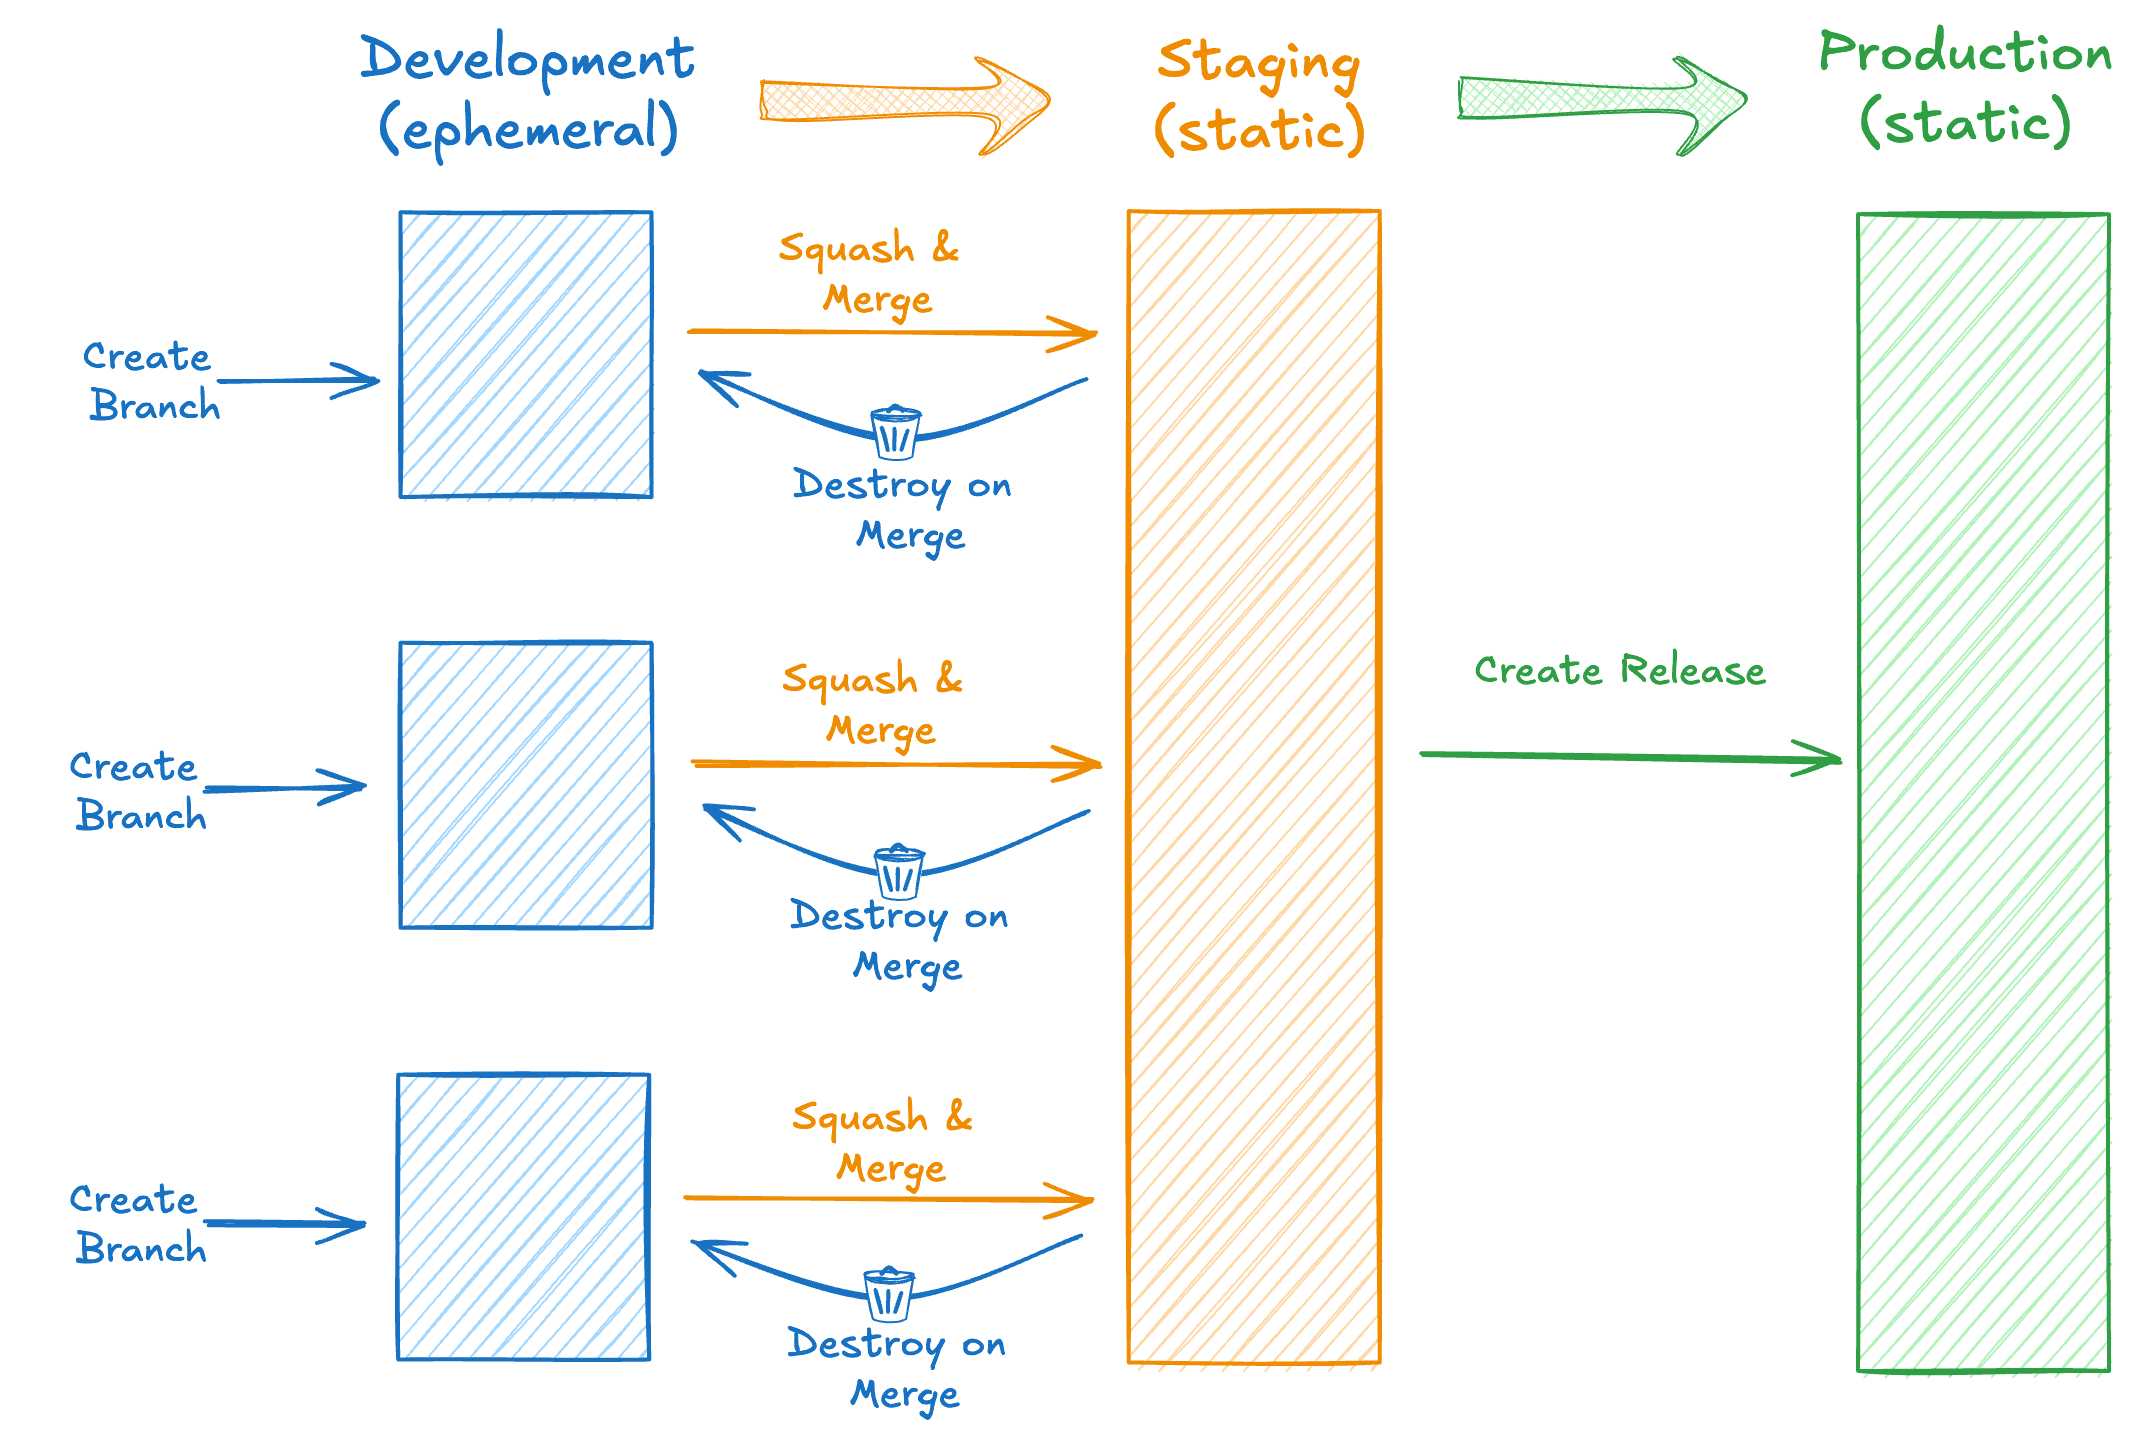
We use a three phase deployment strategy, progressing code through development, staging and production environments. All deploys are differential and will only update infrastructure based on changes. This is done through the following four workflows.
Deploy Branch - Triggered by a commit to a feature or fix branch. It creates an ephemeral development environment that is unique to that branch, using a namespace based on the branch name.
Deploy Staging - Triggered by a commit (including merge commits) to the main branch. It updates the existing static staging environment with any incoming changes.
Destroy Branch - Triggered on closing a PR. This triggers a destroy script that cleans up all resources associated with an ephemeral branch environment. The destroy scripts have safety features to prevent destroying staging or production environments accidentally.
Deploy Production - Triggered by creating a Github Release. This will deploy the latest code from the main branch to the static production environment.
For the frontend iOS application we have two builds in TestFlight, a development build which points to the Staging environment, and a production build which points to the Production environment. When a Production build is ready it will go out to release.

A typical workflow for progressing code is the following
Create a branch locally
git branch -b feat-new-feature
Push the branch to Github
git push origin feat-new-feature
This triggers an initial environment build, and a test run, which takes around 5 minutes to complete
Write relevant code for the feature including tests, occasionally committing and pushing to GitHub
git add <file-name> <file-name> <file-name>
git commit -m “feat: added the new thing”
git push origin feat-new-feature
Every push to GitHub triggers another deployment workflow run. Which will do a deployment, only deploying changes, and doing a full test run. This typically takes 2 to 3 minutes, with the majority of the time being the test run
When the work is done and we’re ready to merge we’ll squash and merge the PR into main. We have rules that only allow merging branches where the GitHub workflow has completed successfully, which includes tests.
On merging the PR, two workflows are triggered
Staging environment is deployed, and additional tests run
Branch environment is destroyed.
If a PR is abandoned, not merged, but simply closed. Only the branch destroy workflow is triggered.
We tend to create branches for smaller pieces of work. To implement a feature, it may require 3 or 4 branches to get all the work done. Smaller branches mean smaller scope of the change with each deployment, and higher reliability of deployment.
Once we’ve completed all the work for a feature we’ll cut a release. This is done exclusively in the GitHub Release UI where we generate change notes and associated new releases.
This triggers a production deployment.
This is how we progress code. We do not do any feature flagging in the backend, and adopt the expand and contract pattern when making changes to ensure we don’t break clients. This means on release all features are available to all clients.We plan to implement feature flagging in the future in the frontend iOS only application later when it becomes required.
Testing
How we test plays a big part in how we progress code to production. Due to how we’ve built the application, with a lot of third party services, and leveraging fully managed serverless platforms for discrete functionality there is low value in unit tests as a lot of the code is integration code passing data between different services. Integration tests are significantly more useful in this scenario. Even more useful are end-to-end tests as they test an entire workflow, but are significantly more difficult to execute.
When we started building HeyBuddy our early tests were primarily integration tests, but we started to hit some complexity and duplication. I made the call to move to focusing on end-to-end API tests which initially worked well, but became difficult to scale and increasingly complex as what we were testing became more intricate.
The key to writing tests is they need to be relatively easy to write. Every developer has been in a place where writing the tests has taken longer than writing the feature. When this is the norm, it’s easy to decide to skip them or do the minimum to get a passing test. We wanted to be able to create end to end tests quickly, but without compromising the test. We also didn’t want to write end-to-end, integration and unit tests for every feature.
The correct decision at this point, whilst building a backend for a mobile AI character based chat application, was to pause and build an end-to-end test harness from scratch.
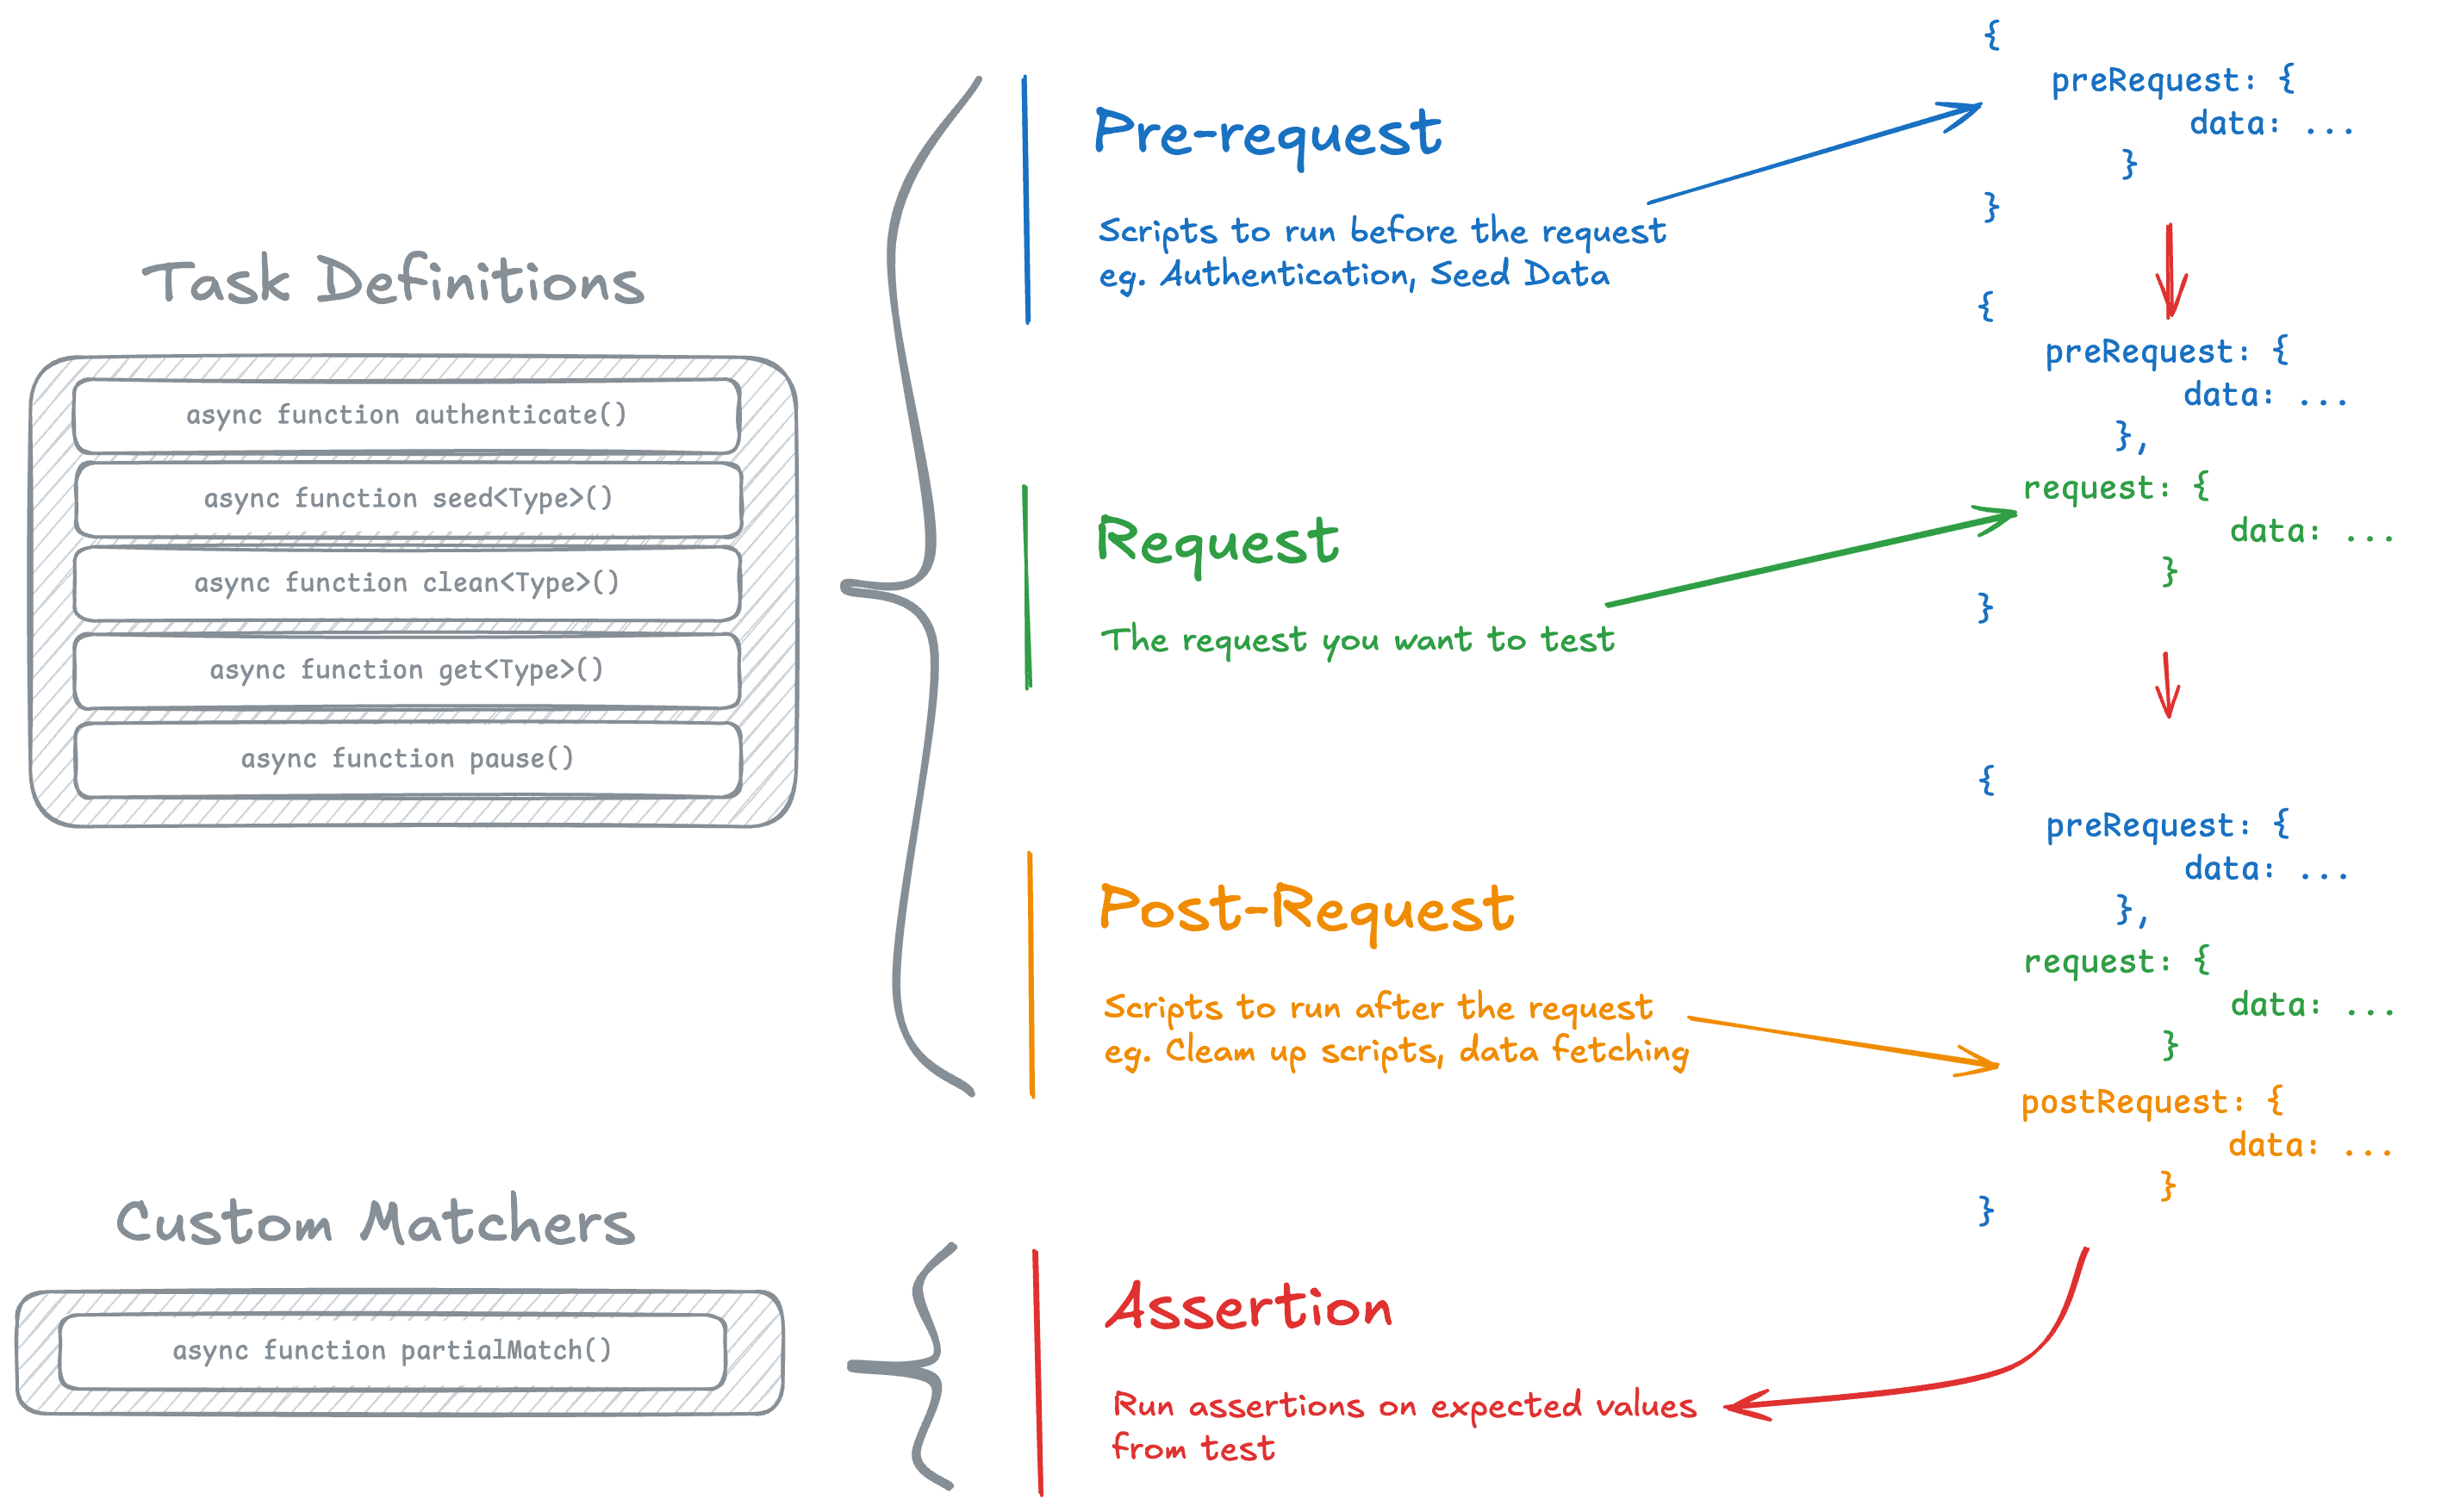
On top of vitest I created a lightweight domain specific language (DSL) implemented in JSON to declaratively define tests in .json files. The DSL defines 4 clear phases in which tasks are run.
Pre-request: Define what tasks you want to run before doing your API request. Typically this includes getting an Access Token from the IdP to access the API, and create any database entities needed for the request.
Request: Definite the request you want to test. This phase can take input from the Pre-request phase, which is how we would pass the previously acquired Access Token.
Post-request: Tasks that happen after the request. Typically used to clean up the database of any items created during testing. Can also be used to verify that data was written correctly. I.e. verify that a GraphQL mutation succeeded by reading an item directly from the database. This phase has access to the inputs and responses from the previous two phases.
Assertions: Define assertions for the expected responses from various phases. This phase has access to all the inputs and outputs from the previous phase. This allows us to validate that data written in the pre-request phase was correctly fetched in the request phase; or that a successful request in the request phase actually wrote the expected data that is fetched in the post request phase. Multiple assertions can be defined in this phase.
The assertion definitions reference the default matchers implemented by vitest. We also extend this by adding custom matchers for the assertions to use.
Shared Incremental State
The key to all of this working is a shared incremental state between the phases. The harness stores all inputs and outputs from each task in each phase in an ever growing JSON object. This state is shared within the phases of a test, but not between tests. The test harness allows us to inject any data from this shared incremental state into the input of a task within a phase.
For example we may want to test a getUser GraphQL query. We’ll define a Pre-request task to create a user, run the getUser query in the Request phase, injecting the userId from the create user task into the request. Finally we’ll delete that user in the Post-request phase with a clean up task. All of the inputs and outputs from each task are written to this incremental state object. We’ll define an assertion comparing data from the Pre-request create user task, and the getUser request to ensure what was fetched is the same as what was created beforehand.
This is a simple example, but this process has allowed us to test some complex multi-step workflows including full transcription, transformation and summarisation workflows that we use in Wandel.
Task
The last piece of the puzzle to make all of this work is the task definitions. Within the phases you can define tasks that do things like create users or get an Access Token. These tasks are just functions defined in code using a common interface. This is where the generic test harness integrates with the system specific integration.
Continuing from the previous example, the create user task definition in the JSON file tells the test harness to execute a corresponding createUser function that is defined as part of a suite of tasks as an extension of the test harness. Likewise the clean up tasks also invoke a function to delete items from the database.
These tasks can be generic where possible. As we use DynamoDB, our clean up tasks are cleanItem and cleanPartition, where they delete a specific item, or an entire partition. The task just requires the item’s key, or the partition key to complete. It doesn’t need to know what it’s deleting, and can be used in any system using DynamoDB.
These tasks allow us to seed unique data required for the tests. We don’t implement a backup and restore strategy for creating user data in a development or staging environment. We use tasks in the test harness to seed unique data on every test run.

The initial version of the test harness was built for HeyBuddy, but as the implementation is mostly generic we were able to repurpose it easily for Wandel. The only code that needed to be updated was the Task definitions for data seeding, as the data models are different.
This might seem like overkill, but it’s actually allowed us to move faster. The custom DSL in combination with AI coding assistants now makes defining tests trivial. We now use Test Driven Development (TDD) very easily when building features. The general workflow now looks like this
Update GraphQL schema with relevant schema changes required for a feature
Use Zed’s new AI feature, using Claude Sonnet 3.5, to add existing test definition files, and the newly updated GraphQL schema into the context
Ask it to generate tests for the changes you’ve just made to the schema.
It accurately generates test definitions for the changes to the GraphQL schema
For a recent feature release this process took about 2 minutes, and it left us with a set of tests to verify the changes to our schema (3 new mutations, 2 queries, 1 new type and an extension to an existing type). From here it was easy enough to get to writing the code, periodically running those tests to verify. The generated tests were almost flawless, with only one test needing a single character change to run. It did this with no formal schema definition for the test harnesses DSL, just the previous examples. Currently we have over 60 end-to-end tests defined like this in the system for approximately 30 operations.
Other features of the test harness include
Isolation: Each test is isolated from each other, and due to how we isolate data within the application we can run this test suite within any environment without impacting other users.
Local filtered invoke: The ability to invoke just one or a subset of tests at a time locally. So no need to run the full test suite while developing.
HTTPS support: It works for any HTTPS request, not just GraphQL. This allows us to extend it to our other (non-GraphQL) endpoints.
Debug Support: On test failure we log the entire incremental state to allow us to debug. We also log the state based on an environment variable.
At some point we’ll explore open sourcing the harness, but for now our focus is building our core applications powered by this harness.
We still write integration tests, and unit tests where it makes sense, but those are to catch edge cases that the test harness struggles to isolate. This approach inverts the test pyramid.
What’s Next
In the previous post about how Wandel came to be, it talked about how one of our aims with Senzo X was to create reusable code we could take from one project to another. We achieved that with HeyBuddy and saw the benefits with Wandel.
We will carry on evolving this code base of reusable components with each new project. This post has only lightly touched on our reusable webhook handler and authentication integrations, which will be covered in more depth in later posts as they become more evolved. One of the nice unexpected benefits is that building reusable components works well with AI tools which accelerates us further.
With each iteration we move faster, with Wandel taking half the time of HeyBuddy. We see future apps taking even less time without compromising on robustness, security, scalability or user experience.
